


 March 16th, 2008
/
March 16th, 2008
/ 
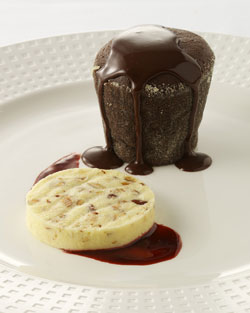
This recipe is all about my childhood love affair with Fudgsicles combined with my abiding affection for the flavor of malt. Malt powder was a staple in our house when my brother and I were growing up, and my mom often whipped up chocolate malteds in the blender. They were so good! I decided to combine these favorite flavors in a semi freddo, which is a frozen dessert with a lighter texture than ice cream. My semi freddo is lightened with beaten egg whites, cream, and egg yolks, all folded into the chocolate mixture to insert air.
The “boings” are tricky at first but once you get the hang of them, they are pretty easy. I remember making them to order for 350 guests at the Aspen Food & Wine Classic. That was tough! Because of the altitude, the sugar never caramelized quite right and was hard to keep fluid.
Finally, I serve this dessert with tuiles flavored with cayenne. When Sara Moulton was a guest on my Food Network show, Sweet Dreams, she made very similar ones. I thought they would taste great with chocolate and they do – after all, historically, chocolate and chili go together.
Ingredients
Serves 15 to 20
Chocolate Mixture:
8 large yolks
2/3 plus 1/4 cups granulated sugar
1/2 cup plus 1 tablespoon whole milk
1/4 cup Vanilla Brandy (see below) or brandy
1/4 cup malt powder
1 vanilla bean, split
1 cup semisweet chocolate pistols, or coarsely chopped semisweet chocolate
Cream and Meringue:
3 1/2 cups heavy cream
1/3 cup large egg whites (from 2 to 3 eggs)
1/4 cup granulated sugar
To Serve:
Chocolate Bergamot Paint (see below)
24-Karat Gold Syrup (see below)
About 1 cup finely chopped semisweet chocolate
Cocoa powder, for sprinkling
Powdered sugar, for sprinkling
Pistachio Chili Tuiles (see below)
Caramel Boings (see below)
Oranges in Star Anise (see below)
Instructions
1. To make the chocolate mixture, line 15 to 20 2 1 /2-inch round collars with strips of 2-inch-high acetate and put them in the freezer. Alternatively, line cupcake tins with paper liners and set aside.
2. In a large metal bowl, whisk together the yolks, sugar, milk, brandy, and malt powder. Add the vanilla bean. Set the bowl over a saucepan holding simmering water. Do not let the bottom of the bowl touch the water. Whisking constantly, cook over medium heat until the mixture thickens and ribbons back on the surface when the whisk is lifted. Remove from the heat and lift out the vanilla bean. Rinse the bean and set aside to dry. Use it to flavor sugar or brandy. Whisk the chocolate into the hot mixture until melted and the mixture is smooth and evenly colored. Set aside to cool almost completely.
3. To prepare the cream and meringue, in the bowl of an electric mixer fitted with the wire whisk, whip the cream until stiff peaks form. Refrigerate to keep chilled.
4. In another clean, dry bowl of an electric mixer fitted with the wire whisk, beat the egg whites until nearly stiff. Gradually add the remaining 1 /4 cup of sugar and continue beating until stiff peaks form.
5. Fold the whites into the chocolate mixture in thirds Do not worry if specks of whites remain in the mixture. Fold the chilled cream into the mixture just until blended. Pour into the collars or cupcake pans, filling them to within 1 /4 inch from the rim. Freeze for at least 8 hours or overnight.
6. To serve, paint a large swatch of chocolate paint on a white plate. Drizzle a swipe of gold syrup next to it.
7. Take a semi freddo from the freezer and remove the collar. Spread the chopped chocolate in a shallow dish and dip the bottom of the semi freddo in it to coat. Sprinkle the top with cocoa powder and then powdered sugar. Remove the acetate and set the semi freddo on top of the chocolate paint. Insert a tuile in the center of the semi freddo. Lean a boing against the side of the semi freddo. Arrange 2 orange segments on the top of the plate and serve immediately.
Vanilla Brandy
Makes about 2 cups
2 cups brandy
6 used vanilla beans or 1 fresh vanilla bean, halved
1. Pour the brandy into a glass jar with a lid. Add the vanilla beans and cover.
2. Set aside for 2 days to give the vanilla time to infuse the brandy. Use as directed. The brandy will keep for up to 6 months. Replenish the brandy as you use it. Start fresh when it begins to lose its vanilla flavor.
Chocolate-Bergamot Paint
Makes about 2 1/2 cups
4 ounces unsweetened chocolate
9 ounces semisweet chocolate
1/2 cup light corn syrup
1 cup strong, brewed Earl Grey tea
1. In the top of a double boiler set over barely simmering water, melt the chocolate until smooth.
2. Add the syrup and tea at the same time and whisk until smooth. The mixture will appear to break but if you keep whisking, it will come together. Cover and keep warm until ready to use.
24-Karat Gold Syrup
1 cup light corn syrup
1 teaspoon 24-karat gold dust, see Note
In a small bowl, whisk together the ingredients and keep chilled until ready to use. Note: Gold dust is sold in gourmet or baking supply stores.
Oranges in Star Anise
Makes about 2 cups
1 cup water
1 cup granulated sugar
1 teaspoon star anise pieces
1/4 vanilla bean
1 orange, cut away from the membrane to form natural segments
1. In a saucepan, combine the water, sugar, star anise, and vanilla bean and bring to a boil over medium-high heat. Remove form the heat.
2. Add orange segments and let cool. Cover and let the oranges macerate in the refrigerator for at least 8 hours or up to 3 days.
Caramel Boings
Makes about 40 boings
2 cups sugar
1/2 cup water
1. Pour the sugar into the center of a deep saucepan. Carefully pour the water around the sides of the pan, trying not to splash any sugar onto the sides. Do not stir but gently draw your finger through the water and then twice through the center of the sugar, making a cross, to moisten it. Bring to a full boil over high heat and cook without stirring for 10 to 15 minutes, or until amber colored. Swirl the mixture occasionally to even out the color. Test the color of the caramel periodically by putting a drop on a white plate. When it’s slightly lighter than you want, submerge the bottom of the saucepan into an ice water bath to stop the cooking. Swirl the pan for even cooling.
2. Meanwhile, oil a sharpening steel very lightly with flavorless vegetable oil. When the caramel has cooled enough to fall slowly form a spoon, gather up about 1 tablespoon and hold it over the saucepan. Let it drop and once a strand falls from the spoon, hold the steel over the pan and wind the strand of caramel over the steel to form a coil, or spring-like shape. When the coil reaches the end of the steel, pinch the end to cut it. Let it cool for about 10 seconds on the steel and then slide off onto a sheet of parchment paper folded like an accordion. This keeps the boings from sticking to the paper. Repeat to make about 20 coils, or boings. Rest the saucepan on a folded kitchen towel to keep it from cooling too quickly. If the caramel cools too much to work with, return to gentle heat until it reaches the correct consistency.
3. Store in a airtight container, with a sheet of accordion-folded parchment paper between each boing.
Pistachio Chili Tuiles
Makes about 30 tuiles
1/2 cup granulated sugar
5 tablespoons unsalted butter
3 tablespoons light corn syrup
1/2 cup chopped pistachios
3 tablespoons all-purpose flour
2 tablespoon corn meal
1 tablespoon fresh lemon juice
3/4 teaspoon cayenne pepper
1. Preheat the oven to 325°F. Line a baking sheet with a silpat. You may need more than one baking sheet.
2. In a small saucepan, bring the sugar, butter, and corn syrup to a boil over medium heat and cook, stirring, for 1 minute.
3. Remove from the heat and stir in pistachios, flour, corn meal, lemon juice, and cayenne pepper until well mixed. Let the batter cool to room temperature.
4. Roll the batter into tiny balls, about the size of large chickpeas, between your palms. Arrange about 3 inches apart on the silpat and bake for 10 to 15 minutes or until the balls have spread, turned glassy, and are light golden brown. Cool on the pan and then remove carefully with a spatula. Store in an airtight container until needed.